Introduction
Connecting a bottleless water cooler to your building's cold water supply is manageable for standard setups, but the margin for error is narrower than it looks. Most installations that fail within 48 hours come down to three things: improper fitting connections, wrong supply line identification, or a skipped flush cycle before powering on.
Basic point-of-use units with T-adapter connections are manageable for a capable DIYer. RO-integrated systems that require drain lines, or installations where the water source is far from the intended location, are a different matter. Those scenarios benefit from a licensed professional.
Skipping steps in either type of installation creates predictable problems:
- Misfit compression fittings develop slow leaks that cause water damage over days, not hours
- Connecting to a hot supply line destroys filters and voids warranties
- Skipping the pressure check leads to poor flow or premature equipment failure
This guide covers the full installation sequence: site prep, connections, flush cycles, post-installation validation, and the specific points where calling a professional makes more sense than pushing through.
Key Takeaways
- Bottleless coolers connect directly to a cold water supply line — no bottles, no deliveries, no running out
- Before installing, confirm water pressure is 40–60 PSI, a grounded outlet is within 6 feet, and a drain path is available for RO units
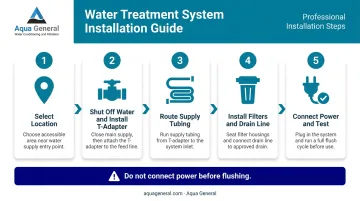
- Installation follows six steps: choose location → shut off water → install T-adapter → route tubing → flush filters → power on and test
- RO systems require a drain line connected above the P-trap — not near a garbage disposal
- For wall routing, code compliance, or RO drain setup, call a TCEQ-licensed water treatment specialist
Bottleless Water Cooler Installation Guide
Installation breaks into four phases: site preparation, water supply connection, filtration setup, and final validation. Skipping steps in any phase is the most common source of post-installation leaks and failures.
A straightforward installation in an accessible location typically takes 45 to 90 minutes. Installations requiring line routing through walls or over long distances take longer and may require professional equipment and licensing.
Prerequisites and Site Requirements
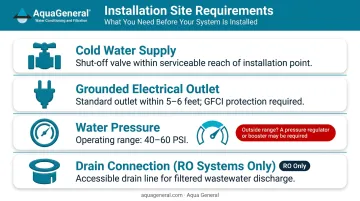
Before touching any tools, confirm these three non-negotiables:
- Cold water supply access — a functioning shut-off valve within a practical distance of the intended location
- Grounded electrical outlet — within 6 feet of the cooler (Quench installation standards specify this distance; Waterlogic's WL2FL manual requires within 5 feet with GFCI protection — no extension cords)
- Drain connection point — for RO units only, a nearby sink drain or P-trap
Water pressure is critical. Most units require incoming feed pressure between 40–60 PSI. The Waterlogic WL2FL specifies this exact range; Quench technicians install a pressure regulator when source pressure exceeds 60 PSI; Bevi requires a minimum of 40 PSI. Pressure outside this window requires a regulator or booster pump installed before the cooler connects — never after.
One rule with no exceptions: the supply line must be cold water only. Connecting to a hot line damages filter media and voids manufacturer warranties.
Houston-area note: Houston's main municipal water system shows average TDS of 230 ppm and chloramines averaging 3.0 ppm based on the 2024 Houston Water Quality Report. These levels reinforce why filtration selection matters here — and why Aqua General's TCEQ-licensed technicians assess local water conditions before recommending a system. Texas IPC regulations also prohibit saddle-type fittings in water supply systems, which affects how RO drain connections must be made.
Do not proceed if:
- No accessible shut-off valve exists within a serviceable distance
- Supply pressure falls outside the 40–60 PSI range without correction
- No drain path can be identified for an RO unit
Tools and Materials Required
Essential tools:
- Adjustable wrench and pliers (compression fittings)
- Phillips and flathead screwdrivers
- Teflon tape (all threaded connections)
- Tubing cutter
- Bucket and absorbent towels
- Work gloves
- Water pressure gauge — check pressure before connecting; values outside 40–60 PSI require correction before proceeding
Components typically included with the unit:
- T-adapter or feed water adapter (may include nuts for 3/8 in. or 1/2 in. feed lines)
- Food-grade supply tubing
- Shut-off valve
- Compression fittings
Use only manufacturer-specified materials. Underspec fittings are a leading cause of slow leaks — substitutes must match the unit's rated materials exactly.
For RO installations, also confirm you have:
- Drain saddle or air-gap fitting (verify whether included or purchased separately before starting)
How to Install a Bottleless Water Cooler
The most common installer error: connecting power before the water line is flushed and confirmed leak-free. Follow this sequence exactly.
Step 1 — Select and prepare the location
Choose a stable, level surface near the grounded outlet and water source. Clear the area and confirm the ventilation clearance at the back of the unit matches the manufacturer's specification.
Step 2 — Shut off water and install the T-adapter
Turn off the cold water supply at the shut-off valve. Relieve line pressure by briefly opening a downstream faucet. Disconnect the cold supply line, install the T-shaped feed water adapter, and reconnect the cold supply line to the top port. Attach the cooler's supply tubing to the quick-connect fitting on the adapter.
Apply Teflon tape to all threaded connections before hand-tightening. Finish with a wrench — but avoid overtightening plastic fittings, which crack rather than compress.
Step 3 — Route and secure the supply tubing
Run food-grade tubing from the T-adapter to the cooler's inlet. The line must be free of kinks, sharp bends, and pinch points. For concealed installations routed through walls or above ceilings, use appropriate clamps and wall plates to protect the line.
Step 4 — Install filters and connect drain line (RO units)
Seat filter cartridges in the correct flow orientation per manufacturer instructions — reversed cartridges will not flush or filter properly.
For RO units: install the drain saddle on the P-trap or a straight section of drain pipe. According to Pentair PRF-RO installation guidelines, position the drain connection above the P-trap and never connect near a garbage disposal — back pressure can cause air-gap overflow. Maintain adequate downward slope in the wastewater tubing to prevent standing water.
Slowly open the shut-off valve and run a complete flush cycle per your unit's instructions:
- Quench units: discard the first full gallon
- Avalon A52: flush for a minimum of 1 minute
- All units: the goal is clearing carbon fines and fully priming the filter media
Step 5 — Connect power and test
Only after confirming zero leaks at all connections, plug into the grounded outlet. Dispense short bursts from both cold and hot taps to clear air pockets. Allow 15–30 minutes for hot water to stabilize; cold performance reaches full temperature over several hours.
Post-Installation Checks and Validation
Complete these checks before calling the installation done:
- Inspect every fitting with dry hands and a dry towel — slow seeps are invisible on a wet surface
- For RO units, observe that wastewater flows freely through the drain line with no pooling
- Confirm the unit sits level with no rocking
- Verify the drip tray is seated and draining freely
- Water dispensed after the flush cycle should have no strong taste or odor
Plan a follow-up check at 24–48 hours. Fittings that feel hand-tight during installation can develop slow leaks after a day of pressure cycling. This second look catches the majority of delayed failures.
Common Installation Problems and Fixes
Most post-installation issues fall into three categories: connection leaks, flow problems, and off-taste from the filter. Here's how to diagnose and fix each one.
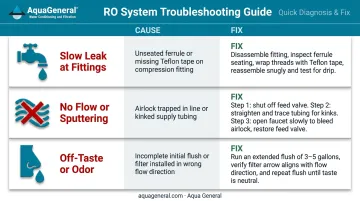
Slow or Persistent Leak at Fittings
Problem: Water seeping from the T-adapter or compression fitting after installation.
Likely cause: Insufficient Teflon tape on threaded connections, or a compression ferrule not seated squarely before tightening.
Fix: Shut off water, relieve pressure, disassemble the fitting, and inspect the ferrule for deformation. Apply fresh Teflon tape and reassemble. If the fitting body is cracked from overtightening, replace the entire fitting before restoring water supply — never seal a cracked fitting with tape or sealant.
No Water Flow or Intermittent Sputtering
Problem: No water dispenses, or flow starts and stops erratically after powering on.
Likely cause: Trapped airlock in the supply line, kinked tubing, or a shut-off valve not fully reopened after installation.
Fix: Work through these steps in order:
- Confirm the shut-off valve is fully open
- Trace the supply tubing for kinks or tight bends and re-route if needed
- Dispense short bursts at both taps until flow runs continuously and evenly
Filter Taste or Odor in Initial Dispense
Problem: Water in the first hours of operation has an off-taste or detectable odor.
Likely cause: Incomplete flush of the filter media during installation — carbon filters shed fine particles if you skip the manufacturer's required flush volume.
Fix: Run an extended flush cycle per the filter manual, discarding the output until the taste clears. If the problem persists beyond the recommended flush volume, verify the filters were installed in the correct flow direction. Cartridges installed backward neither flush nor filter correctly — remove them, check the flow-direction arrow, and reseat them properly.
Pro Tips for Installing a Bottleless Water Cooler Effectively
Document Shut-Off Valve Locations
Note or photograph where both ball valves — at the water source and behind the cooler — are located. In commercial settings where multiple people access the area, this prevents delayed response during a leak event.
Plan for Filter Replacement Access
The unit and filter housings need enough clearance to swap cartridges without disconnecting the water line. A filter housing facing a wall or cabinet turns a routine 10-minute task into a frustrating, time-consuming one.
Know When to Call a Professional
Some installations go beyond basic DIY territory:
- Cutting into a water main
- Routing tubing more than 30–40 feet through finished walls
- Meeting Texas IPC potable water connection requirements
- Setting up an RO air-gap drain configuration
These scenarios require a TCEQ-licensed Water Treatment Specialist — specifically a Class III WTS licensee qualified for RO system installation and potable water connections. For Houston-area customers, Aqua General's TCEQ-licensed, WQA-certified technicians handle these installations correctly the first time, keeping your system under warranty and meeting local code.
Conclusion
Installation quality directly determines how a bottleless cooler performs over its full service life. A properly seated filter in a correctly pressurized, leak-free system delivers consistent water quality from day one. An improperly installed unit risks contamination, component damage, and voided warranties — problems that trace back to skipped steps like a missed pressure check or a loose fitting.
Prepare thoroughly, follow the manufacturer's sequence without shortcuts, validate before use, and call a licensed professional when complexity warrants it. If you're in the Greater Houston area and want a professional to handle the install, Aqua General's TCEQ-licensed technicians can get your system set up correctly the first time — contact them at (713) 664-4601.
Frequently Asked Questions
Are bottleless water coolers worth it?
For most Houston-area homes and businesses, yes. Quench reports bottleless systems save businesses 30%–80% compared to bottled water delivery, with unlimited on-demand filtered water and no delivery logistics. In Houston, where municipal water averages 230 ppm TDS and contains chloramines, the filtration benefit directly improves drinking water quality — not just the budget.
How much does a bottleless water cooler cost?
Unit prices vary by type and filtration stage — countertop models run roughly $320–$440, while RO-integrated freestanding units reach $620–$775. Installation fees run $80–$135 for standard setups; complex installations cost more. Contact Aqua General at (713) 664-4601 for Houston-area pricing.
Can I install a bottleless water cooler myself?
Basic point-of-use units with T-adapter connections are DIY-friendly for anyone comfortable with basic plumbing. RO systems, installations requiring wall routing, or setups subject to Texas building codes are better handled by a TCEQ-licensed water treatment specialist to protect the warranty and ensure compliance.
How long does bottleless water cooler installation take?
Most standard installations are completed in 45 to 90 minutes by a technician. DIY installs take longer, and any setup requiring wall routing or extended line runs will add significant time and typically needs professional tools.
What water pressure is needed for a bottleless water cooler?
Most units require incoming water pressure between 40–60 PSI. Pressure above 60 PSI requires a pressure regulator; pressure below 40 PSI may require a booster pump. Verify your site pressure with a gauge before installation — not after connecting the unit.
Do bottleless water coolers need a drain line?
Standard point-of-use filtration coolers do not require a drain line. Reverse osmosis models produce wastewater — the EPA notes typical POU RO systems generate 5 or more gallons of reject water per gallon treated — which must be routed to a nearby drain via an above-trap connection. This drain requirement is the primary installation difference between standard and RO-integrated units.