A licensed plumber or TCEQ-licensed water treatment specialist is the preferred option for most homeowners. Experienced DIYers with solid plumbing knowledge can manage it in straightforward setups, but the consequences of getting it wrong go beyond inconvenience: bypassed NSF certification validity, hard water bleed-through from a misconfigured system, drain errors that cause flooding, and voided manufacturer warranties are all real outcomes of improper installation.
This guide walks through the complete process — from pre-installation assessment through post-installation validation — following NSF/ANSI 44 best practices.
Key Takeaways
- Only systems certified to NSF/ANSI Standard 44 are verified for hardness reduction performance and material safety
- Test water hardness in grains per gallon (GPG) before sizing — Houston-area hardness varies significantly by water district
- Installation follows a fixed sequence: site selection, bypass valve, supply and drain lines, salt loading, then initialization
- Post-installation, measure treated water hardness; the WQA target for soft water is less than 1 GPG
- For Greater Houston homes, a TCEQ-licensed, WQA Certified specialist handles sizing, code compliance, and post-install validation
Prerequisites and Safety Considerations
What to Confirm Before You Touch Any Plumbing
Three measurements must be in hand before installation begins:
- Water hardness in GPG — test directly from your tap; don't rely on general area estimates. Houston's 2024 Water Quality Report shows hardness ranging from an average of 6.4 GPG in the Main System to over 10 GPG in Willow Chase — that's a meaningful difference for sizing purposes
- Daily household water consumption — needed to calculate grain capacity using the formula: hardness (GPG) × gallons used per day × regeneration interval (days)
- Plumbing material — copper, PVC, CPVC, and PEX each require different fittings and adapters; copper supply lines may require soldering before connecting heat-sensitive valve components
- Peak flow rate demand — the IPC converts Water Supply Fixture Units (WSFU) to GPM, not a simple bathroom-count table. The system's rated service flow rate must meet or exceed your home's peak demand; undersized softeners drop pressure noticeably at showers and fixtures.
Site Requirements — Four Non-Negotiables
| Requirement | Details |
|---|---|
| Main supply proximity | Install before the line branches to water heaters |
| Drain access | Floor drain, standpipe, or utility sink — with proper air gap |
| Electrical | Grounded 115V outlet nearby for the control valve transformer |
| Environment | Dry, non-freezing location; exact temperature limits are model-specific |

Hard stops before proceeding:
- The system does not carry NSF/ANSI 44 certification — verify at the NSF certified product listings before purchase
- Household flow rate demand exceeds the system's tested service flow rate
- Local regulations restrict salt-based softeners (check with your municipal utility district or TCEQ guidance for your specific area)
Tools and Materials Required
Essential Tools
- Pipe cutter or hacksaw
- Adjustable wrenches (two — one for holding, one for turning)
- Teflon tape and pipe thread compound
- Fittings and adapters matched to your pipe material
- Bucket and towels for drainage during line cutting
- Level for verifying tank placement
- Silicone lubricant for O-ring connections
What's Typically Included vs. What to Verify
Most NSF-certified systems include the bypass valve, brine line tubing, and drain line fittings. Before starting, check every item against the packing list. Confirm whether the manufacturer calls for flexible braided hoses or rigid pipe connections — this affects what additional materials you need.
Recommended add-ons for Houston-area installs:
- Sediment pre-filter — especially for well water homes in Waller or Brazoria counties, where iron and particulates can damage resin media
- Water hardness test kit — required for post-installation validation (some systems, like Pentair units, include test strips)
With tools and materials confirmed, you're ready to move into the installation steps.
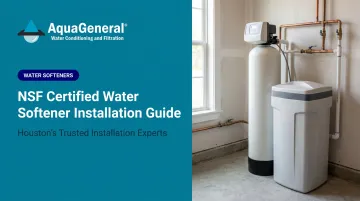
How to Install an NSF Certified Water Softener (Step-by-Step)
The bypass valve and drain line air gap are where most installation failures originate. Before starting, have on hand: Teflon tape, pipe cutters, appropriate adapters for your pipe material, and your pre-installation water hardness reading in GPG.
Step 1 — Site Preparation and Water Shutoff
Choose a location on the main supply line before it branches to water heaters. Then:
- Shut off the main water supply valve completely
- Open the lowest faucet in the home to drain the pipes fully
- Relieve pressure before cutting — this prevents backflow contamination during connection work
Draining pipes completely before cutting isn't optional. Any water remaining in the line creates a contamination risk when you open the pipe.
Step 2 — Bypass Valve and Supply Line Connections
Attach the bypass valve to the softener control head per manufacturer instructions. Then:
- Cut into the main supply line at the chosen location
- Install adapters that match your pipe material (threaded, compression, or push-fit depending on pipe type)
- Connect inlet and outlet ports — inlet from the supply, outlet toward home distribution; reversing these is a common and costly error
- Apply Teflon tape to all threaded connections (minimum 3 wraps) and tighten firmly
If your home has copper supply lines, complete any soldering before attaching bypass valve components — heat will damage O-rings and plastic valve seats.
Step 3 — Drain Line and Brine Line Connections
IPC 608.4 mandates an air gap on all water treatment equipment discharge lines — treat this step as a code compliance requirement, not a preference.
Drain line:
- Route from the control valve to the drain receptor with a continuous downward slope (any uphill section causes backflow during regeneration)
- Terminate with an air gap of at least 2× the effective pipe opening (never less than 1 inch) between the drain line and the receptor; this is a health code requirement under IPC 608.4
- Acceptable termination points: floor drain, standpipe, or laundry utility sink
Brine line:
- Connect from the control valve to the salt tank
- Check for kinks along the full run ; kinks block salt draw during regeneration
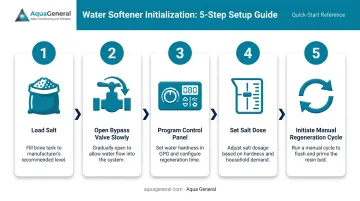
Step 4 — Salt Loading, Initialization, and Programming
- Load salt into the brine tank using the manufacturer-specified type — pellet or coarse solar salt works for most systems; avoid rock salt unless the manual explicitly permits it
- Slowly open the bypass valve to let water enter gradually, as sudden pressure can dislodge fittings
- Program the control panel with your current time of day, water hardness in GPG, and regeneration frequency based on household daily use
- Set the salt dose — WQA best practice targets 4,000 grains removed per pound of salt, with no more than 5 gallons of regeneration water per 1,000 grains removed
- Manually initiate a full regeneration cycle to flush the resin, charge the brine, and confirm the system completes all cycle stages without errors
Post-Installation Checks and Validation
Immediate Visual Checks
Run through these before leaving the installation:
- Inspect every fitting and connection point for drips or seepage
- Confirm the drain line is discharging freely — watch for backup at the drain receptor during regeneration
- Verify the brine tank is filling to the correct water level per the manual
- Confirm the bypass valve is fully in the service (in-line) position, not partially bypassed
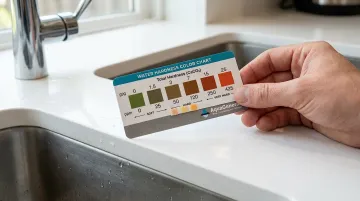
Functional Hardness Validation
After one complete regeneration cycle, collect a water sample from a downstream tap and test with a hardness kit. Compare the result against your pre-installation baseline.
What the numbers mean:
- The WQA defines soft water under NSF/ANSI 44 as less than 1 GPG (less than 17.1 mg/L)
- Treated water testing above 1 GPG after a full regeneration cycle indicates a problem requiring troubleshooting
- Signs of continued hardness: visible scale on fixtures within days, reduced soap lather, water spots recurring quickly
Skipping this step is one of the most expensive mistakes in water softener installation. A system can complete its cycle, show no error codes, and still deliver hard water — typically due to a hardness setting that's too low or insufficient salt. Catching this during installation takes minutes. Left unchecked, hard water scale builds inside water heaters, dishwashers, and supply lines within weeks.
Common Installation Problems and Fixes
Even careful installations hit snags. Most are fixable immediately if caught during the validation phase.
The three most common issues involve:
- Bypass valve leaks at connection points
- Drain line backing up during regeneration
- System not softening after startup
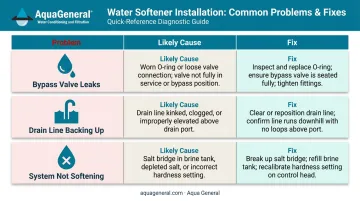
Bypass Valve Leaks at Connection Points
Problem: Water dripping at the bypass-to-head connection after startup
Likely cause: Insufficient Teflon tape, cross-threaded fittings, or a misaligned O-ring in push-fit assemblies
Fix: Shut off supply, depressurize the line, disassemble the connection, reapply Teflon tape (minimum 3 wraps) or reseat the O-ring with silicone lubricant, reassemble firmly
Drain Line Backing Up
Problem: Brine pooling near the drain receptor or backing up into the brine tank
Likely cause: Drain line routed uphill at any point, missing or inadequate air gap, or a clogged drain receptor
Fix: Re-route to maintain continuous downward slope; verify the drain line terminates above the receptor with at least a 2-inch air gap; clear any blockage in the receptor before restarting
System Not Softening After Installation
Problem: Post-installation hardness test shows little or no improvement from baseline
Root cause: Hardness GPG setting programmed too low, insufficient salt in brine tank, or bypass valve left partially in bypass mode
Fix: Correct the GPG input in control settings, verify bypass valve is fully in service position, confirm adequate salt is loaded, then manually initiate a new regeneration cycle and retest
Pro Tips for Effective Installation
Timing: Schedule installation when household water demand is low — early morning or a weekend day works well. Pipes drain fully, and the initial regeneration cycle can run to completion without interruption.
Documentation before you start: Photograph the existing supply line layout, record your pre-installation hardness test result in GPG, and retain the NSF/ANSI 44 certification documentation. Some homeowner insurance policies and appliance warranties require proof of certified equipment. Keep the installation manual — you'll want it for future servicing.
When to hire a specialist instead: Some installations clearly call for professional involvement:
- Copper supply lines requiring soldering
- Older galvanized plumbing that may need partial replacement
- Well water with iron or sediment levels above the softener's rated tolerance
- Local permit requirements for licensed contractor sign-off
Local complexity matters: Across Harris, Fort Bend, Montgomery, Galveston, and surrounding counties, municipal hardness varies widely by district — and well water adds another layer. A TCEQ-licensed, WQA Certified specialist like Aqua General can confirm proper sizing, code compliance, and NSF certification integrity before a single pipe is cut. Aqua General has served the Greater Houston area for over 32 years and offers free on-site water testing based on your actual water, not regional averages.
Conclusion
NSF certification delivers its full value only when the system is installed correctly. A certified softener that's undersized, misconfigured, or improperly connected will fail to protect your plumbing and appliances — and almost certainly voids the manufacturer's warranty.
Successful installation comes down to three non-negotiable phases:
- Preparation — water testing, site assessment, and correct system sizing
- Execution — following the manufacturer's NSF-compliant installation sequence without shortcuts
- Validation — confirming performance before the system enters daily service
If any phase is skipped or rushed, the others can't compensate. For homeowners who'd rather leave the process to a licensed specialist, Aqua General's installation team handles every step across the Greater Houston area — so your system works the way it was certified to from day one.
Frequently Asked Questions
What water softeners are NSF approved?
NSF-approved water softeners are certified to NSF/ANSI Standard 44, which covers hardness reduction performance, material safety, and structural integrity. You can verify specific models at the NSF certified product listings database — the NSF mark and applicable standard number must appear on the product itself.
How much does it cost to install a water softener?
According to Angi's 2026 cost data, total project costs range from $150 to $11,000, with most homeowners around $1,500. DIY cost is primarily equipment; professional installation adds labor typically running $45–$200/hour. Additional costs arise from plumbing modifications, permit requirements, or pre-filtration needs for well water setups.
What is NSF/ANSI Standard 44, and why does it matter for installation?
NSF/ANSI 44 certifies that a residential cation-exchange water softener meets verified standards for hardness reduction, material safety, pressure drop, and brine system accuracy, without introducing contaminants into the water supply. For installation, the standard's flow rate and capacity requirements directly inform sizing decisions that must satisfy ICC plumbing code minimums.
Can I install an NSF certified water softener myself, or do I need a professional?
DIY installation is manageable for experienced homeowners with accessible plumbing and no permit requirements. Professional installation is strongly recommended when copper lines require soldering, well water contains iron or sediment, or local permits require a licensed contractor. A TCEQ-licensed specialist handles code compliance and protects your NSF certification coverage.
How long does water softener installation typically take?
A straightforward installation with accessible plumbing typically takes 2–4 hours for an experienced installer. Jobs involving plumbing modifications, pre-filter additions, or well water complications can extend to a full day. First-time DIY installations generally run longer than professional ones.
How do I know if my water softener is working correctly after installation?
Use a water hardness test kit to compare pre- and post-installation GPG readings after one complete regeneration cycle. A properly functioning NSF/ANSI 44 certified system should bring treated water below 1 GPG. Other signs it's working: rich soap lather and no new scale buildup on fixtures after a few weeks.