According to the EPA, more than one in five Americans drink water treated with chloramines — and Houston's municipal system is one of them. That matters when choosing and installing a system, because chloramines are harder to remove than chlorine and require extended carbon contact time to neutralize before they can damage the membrane.
This guide covers everything from confirming site readiness to validating your output with a TDS meter. Follow the sequence, don't skip steps, and you'll have clean, filtered water running within a few hours.
Key Takeaways
- Connect the red supply line to cold water only — hot water causes irreversible membrane damage
- Complete the initial flush before consuming any output water — membranes ship with food-grade preservatives
- The flow restrictor on the waste line is not optional; it pressurizes the membrane to produce output water
- Confirm installation success with a TDS meter after 10+ minutes of run time — a properly functioning system should read significantly lower than your tap baseline
- Houston's chloramine-treated municipal water requires the dual carbon block — a single carbon stage won't fully neutralize it
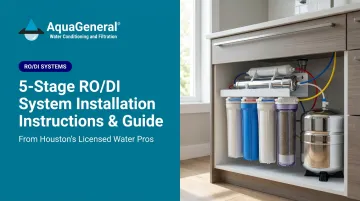
What Is a 5-Stage RO/DI System and Why It Matters
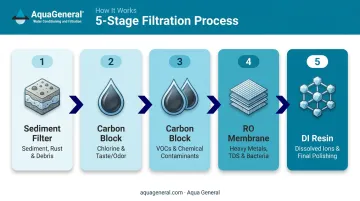
How Each Stage Works
A 5-stage RO/DI system processes water in sequence, with each stage targeting a different category of contaminants:
| Stage | Filter Type | What It Removes |
|---|---|---|
| 1 | Sediment filter | Particulates, silt, sand |
| 2 | Carbon block | Chlorine, chloramines, VOCs |
| 3 | Carbon block | Extended chloramine contact time |
| 4 | RO membrane | Up to 98–99% of dissolved solids* |
| 5 | DI resin | Remaining ions, polishes to near-zero TDS |
*DuPont FilmTec residential membranes achieve 98–99% stabilized salt rejection under standard test conditions.
Why the Second Carbon Block Matters in Houston
Houston Water's 2024 Water Quality Report confirms the Main System uses chloramines, with average residuals of 3.0 ppm. The Water Quality Association notes that traditional activated carbon can require 10 minutes or more of contact time to fully break down chloramines. A single carbon stage may not provide enough time — the second carbon block in a 5-stage system fills that gap before water reaches the membrane.
Contaminants a 5-Stage System Addresses
NSF/ANSI 58-certified residential RO systems can be tested for reductions including:
- Lead and arsenic (pentavalent)
- Hexavalent chromium
- Radium 226/228 (alpha particle radioactivity)
- Disinfection byproducts (THMs, haloacetic acids)
- Total dissolved solids
Houston's 2024 report puts average TDS at 230 ppm — well above what most people prefer for drinking water.
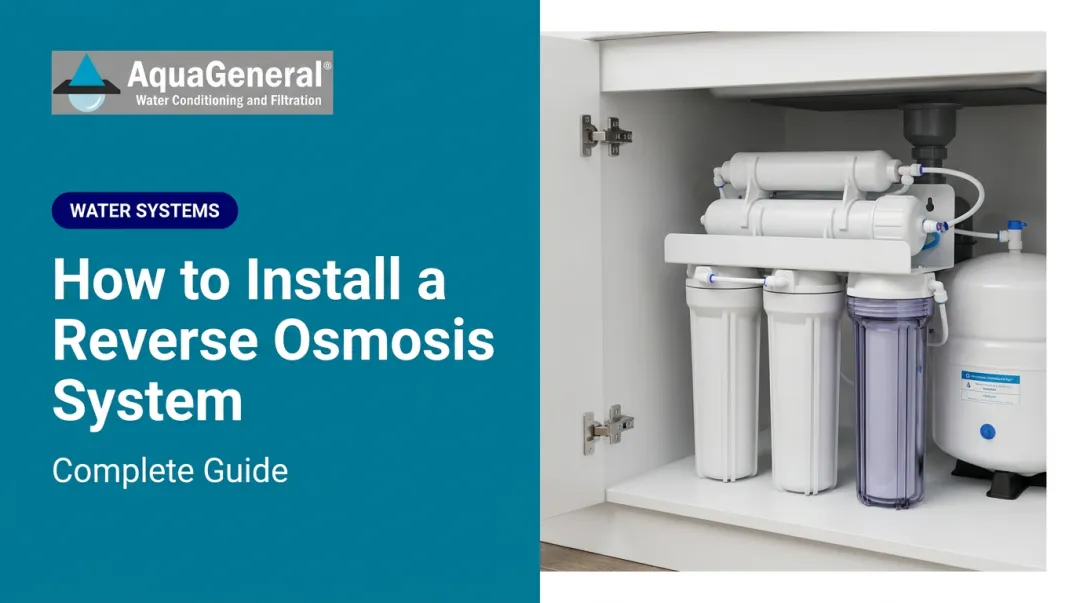
5-Stage RO/DI System Installation Guide
Installation follows a defined sequence, and each connection must be confirmed before moving to the next. Skipping that check is the most common cause of leaks — and the easiest one to prevent.
Prerequisites and Safety Considerations
Site readiness checklist before picking up a drill:
- Identify a cold water line — under a kitchen sink is ideal
- Confirm a nearby drain for the waste line
- Choose a mounting surface that can support the unit's weight when full (studs or a dedicated board, not drywall alone)
- Inspect all canisters for shipping damage before beginning
Water pressure: The Pentair PRF-RO manual specifies an operating range of 40–80 psi, with 60 psi as the ideal target. Below 40 psi, membrane performance degrades and a booster pump is recommended.
Non-negotiables:
- Supply line connects to cold water only — RO membranes have a maximum operating temperature, and hot water exceeds it, damaging the membrane
- No water consumed until the initial preservative flush is complete
Tools and Parts Required
Typically needed (confirm what ships with your system):
- Drill with 1/4" bit (for saddle clamp drain connection)
- Adjustable wrench
- Teflon/PTFE tape
- Sharp tubing cutter or scissors
- TDS meter for post-installation validation
- Pan-head screws and wall anchors
Optional but useful for a clean permanent installation:
- Brass or plastic Y-adapter (for sharing a washing machine cold line)
- Faucet diverter adapter (for under-sink connection)
- Float valve (for storage containers)
- Booster pump (if home pressure is consistently below 40 psi)
How to Install Your 5-Stage RO/DI System Step by Step
Step 1 — Mount the main RO unit
Secure the housing to the wall using pan-head screws driven into studs or a solid backing board. Mount the DI stage to the right of the main unit if possible. Keep both level and accessible for future filter changes.
Safety note: Don't position the unit directly over electrical outlets. If your space makes that unavoidable, install a protective outlet cover before you begin — filter changes involve water, and a drip onto an uncovered outlet is a real hazard.
Step 2 — Connect the red (supply) tubing to a cold water source
Three common connection methods:
| Method | Best For | Notes |
|---|---|---|
| Hose bib adapter | Utility areas, garages | Straightforward; connects to an existing hose bib |
| Faucet diverter valve | Under-sink faucets | No permanent modification required |
| Angled stop valve | Permanent installations | Taps directly into the cold shut-off valve |
All three require cold water only. Wrap all threaded fittings with 2–3 layers of PTFE tape before assembly.
Step 3 — Connect the blue (product water) tubing
Run the blue tubing from the RO unit body to the DI stage input. Push tubing firmly into each quick-connect fitting until it stops, then tug lightly to confirm it's seated. The blue line exiting the DI stage is your final output — this goes to your storage container or point of use.
Step 4 — Install the black (waste/drain) line
Direct the black tubing to a sink drain. For a permanent connection, use a saddle clamp:
- Drill a 1/4" hole in the drain pipe
- Apply the foam gasket to the clamp
- Align and tighten the clamp over the hole
- Insert the tubing no more than 1" into the drain to avoid snagging debris
Step 5 — Verify the flow restrictor on the waste line
Confirm the flow restrictor is installed inline on the black waste tubing in the correct flow direction (check the directional marking on the restrictor body). The restrictor maintains back pressure across the membrane, which is what forces water through to the output side.
Without the flow restrictor installed correctly, the membrane cannot produce output water. Don't skip this verification.
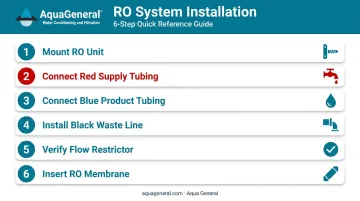
Step 6 — Insert the RO membrane
Run the pre-filters without the membrane installed for 5–10 minutes first — this flushes carbon fines from the new filter stages. Then:
- Turn off the supply
- Open the membrane housing end cap
- Insert the membrane snugly per the manufacturer's orientation (one end is tapered)
- Replace the end cap
- Reconnect the tubing and restore supply
Post-Installation Checks and Validation
Visual and Structural Check
Before turning on water supply:
- Confirm every quick-connect fitting has tubing pushed fully in and the retaining clip seated
- Hand-tighten all filter canisters — snug is sufficient; tools can crack acrylic housings
- Verify the black waste line has clear, unrestricted flow to the drain
- Confirm the blue output line reaches your collection container
Initial Flush
Turn on the water supply slowly with the flush valve in the open (parallel) position. Watch every fitting for drips for the first few minutes. Once confirmed leak-free, allow the system to run and discard the initial output.
Flush duration varies by manufacturer — follow your system's specific guidance:
- Pentair PRF-RO: Minimum 2-hour continuous flush
- Watts: Three complete tank fills and discards
The goal is removing food-grade preservatives from the membrane and carbon fines from the filter stages.
TDS Validation
After the flush is complete, test the output from the DI stage with a TDS meter. Allow at least 10 minutes of continuous run time before testing — TDS creep is a documented phenomenon where first-draw TDS reads high due to differential pressure drop during idle periods. After proper run time, your DI output should read 0–1 ppm TDS.
Common Installation Problems and Fixes
Slow Drip or No Output Water from the Blue Line
Cause: The flush valve is in the open/parallel (flushing) position, or the flow restrictor is missing or installed backwards on the waste line.
Fix: Confirm the flush valve sits perpendicular to the line for normal production. Verify the restrictor is inline on the black waste tubing with the flow arrow pointing in the correct direction.
Leaking at Fittings or Filter Canisters
Cause: Tubing isn't pushed fully into the quick-connect collet, or the filter canister isn't threaded on enough to compress the O-ring.
Fix: For quick-connect fittings, press the retention collar inward and re-seat the tubing; push firmly until it stops, then tug to confirm hold. For canisters, hand-tighten until snug; inspect O-rings for debris or misalignment before retightening.
TDS Reads Above Zero at DI Output After Full Run
Three things typically cause TDS to remain above zero at the DI output: exhausted resin, an out-of-sequence DI stage, or an RO membrane passing higher TDS than expected into the DI stage.
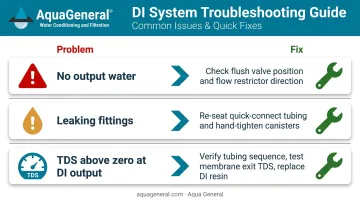
Work through the fix in order:
- Verify the blue tubing from the RO unit feeds into the DI stage input, not the output
- Test TDS at the RO membrane exit — if that reading is high (above ~10 ppm), reseat or replace the membrane
- If membrane TDS looks normal, replace the DI resin cartridge
Pro Tips for a Cleaner Installation
- PTFE tape: Wrap every threaded fitting 2–3 times to prevent slow weeping leaks that can go unnoticed for weeks
- Hand-tighten filter canisters only — if it holds water without dripping, it's tight enough; using a wrench on acrylic housing risks cracking it
- Float valve on storage containers: RO systems produce water slowly and continuously when the supply is open — without overflow protection, an unattended system is a real water damage risk
- New DI resin takes time to stabilize — an air pocket at the top of the canister after first fill is normal and doesn't affect performance
These tips cover the most common DIY pitfalls — but if you'd rather have it done right the first time, Aqua General's TCEQ-licensed and WQA-certified technicians handle professional installation across the Houston area. They'll also ensure your system is correctly sized for Houston's chloramine-treated municipal supply. Call (713) 664-4601) to get started.
Conclusion
Three steps account for the majority of installation failures: connecting to hot water, leaving a quick-connect fitting partially seated, and skipping the initial preservative flush. Get those right, and the rest of the installation is straightforward.
Confirm success with a TDS meter before putting the system into regular use. Stick to a basic maintenance schedule to protect your investment:
- Sediment & carbon block filters: Replace every 6–12 months
- RO membrane: Replace every 2–3 years
- TDS readings: Check periodically — a sudden drop in output quality or inconsistent readings is a sign to call a professional
If something seems off after installation or during routine use, Aqua General's TCEQ-licensed technicians serve the Greater Houston area and can diagnose the issue directly. Reach them at (713) 664-4601 or service@aquageneral.com.
Frequently Asked Questions
How much does a 5-stage RO/DI system cost?
Entry-level residential 5-stage units start around $200–$250 at major retailers. Professional installation adds cost, with labor for point-of-use RO systems typically ranging from $300–$700 depending on complexity. Full installed cost varies based on system capacity, brand, and your home's plumbing configuration.
Do I need a 5-stage RO/DI system?
If your tap water contains chloramines, lead, or elevated TDS — common in Houston and many major U.S. cities — a 5-stage system offers meaningful protection. A 5-stage system also eliminates ongoing bottled water spending.
What is the difference between a 4-stage and 5-stage RO/DI system?
The extra carbon block in a 5-stage system provides more contact time to neutralize chloramines before they reach the membrane. For municipal water treated with chloramines (like Houston's), this additional stage is the more appropriate choice.
How long does it take for a 5-stage RO/DI system to produce water?
Residential membranes are typically rated at 75–100 gallons per day, which works out to roughly 3–4 gallons per hour. Production slows in cold weather due to increased water viscosity. Always discard the first batch after initial installation.
How often should I replace the filters in my 5-stage RO/DI system?
Sediment and carbon block filters every 6–12 months; the RO membrane every 2–3 years under normal use. Replace DI resin when your TDS meter shows output rising above zero. That's the most reliable indicator the resin is exhausted.
Can I install a 5-stage RO/DI system myself, or should I hire a professional?
DIY installation is feasible for homeowners comfortable with basic plumbing. Professional installation is the better call when under-sink access is tight, home water pressure is consistently below 40 psi, or you want the system correctly sized and configured for your specific water supply.