Houston-area homeowners face an additional layer of complexity. The city's 2024 Water Quality Report documents hardness levels ranging from 43.4 to 110 ppm as CaCO3, and municipal treatment relies on chloramines — which are notoriously hard on thin-film composite (TFC) membranes. Getting the pre-installation assessment right matters here more than in most places.
This guide walks through everything: site assessment, step-by-step installation, post-installation flushing, and the most common problems and how to fix them.
Key Takeaways
- Under-sink RO installation typically takes 2–4 hours with basic household tools
- Check water pressure before buying — most systems require 40–85 psi to operate correctly
- Install the faucet and drain saddle before mounting the filter assembly
- Flush the system through 2–3 full tank cycles before the water is safe to drink
- Hard water, iron, or high chloramine levels may require a pre-filter stage before the RO membrane
What to Know Before Installing a Reverse Osmosis System
Skipping the pre-installation assessment is the single most common reason RO systems underperform. Space constraints, low water pressure, and poor feed water quality are each far easier to solve before the system goes in than after.
Site Selection and Cabinet Space
The kitchen sink cabinet is the standard location for good reason: cold supply line, drain pipe, and a potential faucet hole all converge in one spot. But not every cabinet has enough room once the filter manifold, storage tank, and tubing are competing for space.
Before purchasing a system, measure:
- Height from floor — at least 15 inches of clearance is needed for filter cartridge removal
- Depth and width — the tank and manifold need to sit without forcing sharp tubing bends
- Faucet hole availability — check for an unused soap dispenser or sprayer knockout before planning to drill
Water Pressure and Feed Water Quality
According to Watts' residential RO installation manual, the operating pressure range for their systems is 40–85 psi, with a booster pump recommended for incoming pressure below 40 psi. iSpring and APEC manuals cite the same 40 psi floor. If your home's pressure is borderline, test it with an inexpensive gauge before purchasing a system.
Feed water quality directly affects membrane life:
- Hard water causes scaling on the membrane surface, reducing output over time
- Iron fouls TFC membranes prematurely and is difficult to reverse
- Chloramines — which Houston Water uses as its primary disinfectant — are particularly damaging. DuPont FilmTec's technical manual lists free chlorine tolerance for TFC membranes at less than 0.1 ppm
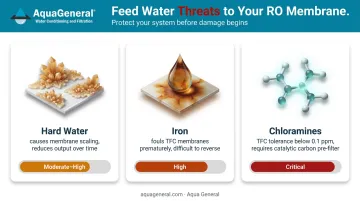
Houston's chloramine-treated water supply makes a catalytic carbon pre-filter a necessary part of any RO installation, not an optional upgrade. If hardness or iron is also present, a water softener upstream of the RO is a smart investment. Aqua General's WQA-certified specialists offer free water testing and can identify what pre-treatment is needed before the membrane goes in.
Tools and Parts Checklist
Tools needed:
- Adjustable wrench and channel-lock pliers
- Power drill with appropriate bits
- Utility knife or tube cutter
- Tape measure, flathead and Phillips screwdrivers, level
- Bucket, rags, safety glasses
- Teflon/plumber's tape
Kit components to verify before starting:
- RO filter manifold and filter cartridges
- Storage tank with tank valve
- Dedicated RO faucet
- Drain saddle or drain tee
- Feed water adapter tee
- Color-coded tubing and mounting hardware
- Booster pump (not included in all kits — relevant if inlet pressure is below 40 psi)
How to Install a Reverse Osmosis System: Step-by-Step
RO installation follows a defined sequence. Mounting the manifold before the faucet is in place, for example, creates unnecessary rework in an already cramped cabinet. Every threaded connection needs Teflon tape, and every push-to-connect fitting needs tubing cut at a true 90-degree angle to seat and seal properly.
Preparing the Site and Faucet Hole
Clear the cabinet completely. Shut off the cold water supply valve under the sink, then open the cold tap at the faucet above to relieve line pressure. Let the remaining water drain into a bucket.
Check whether an existing unused hole can accept the RO faucet — many sinks have a capped sprayer or soap dispenser knockout. If not, drilling is required. One caution: granite and stone countertops should not be drilled with a standard bit. iSpring's manual specifies a ½-inch diamond core bit for granite and explicitly warns against using a hammer drill on natural stone.
Installing the RO Faucet and Drain Saddle
RO faucet: Feed the faucet stem and supply tube through the hole from above, then attach the mounting hardware from beneath the sink. Route the filtered water line now, before the cabinet gets crowded.
Drain saddle: Mark the drill location on the drain pipe above the P-trap. Drill through one wall of the drain pipe only — not both sides. Align the saddle port directly over the hole, then tighten the clamp snugly. Over-torquing will crack the drain pipe.
Connecting the Feed Water Supply
Disconnect the existing cold water supply riser from the shutoff valve. Then:
- Wrap the valve threads with Teflon tape — Watts recommends 7–12 turns clockwise; do not cover the first thread or the opening itself
- Attach the feed water adapter tee so both the RO feed line and the original faucet riser connect to the valve
- Hand-tighten, then add a half-turn with a wrench — no more
Mounting the Filter Assembly, Installing Filters, and Connecting the Storage Tank
Mount the filter manifold to the right side wall of the cabinet at a height that leaves cartridge removal clearance below. Mark pilot holes with a level, drill, and secure the mounting bracket.
Insert each filter cartridge with correct symbol alignment and lock it in place.
For the storage tank, verify the air pre-charge before connecting. Tank pre-charge pressure specifications vary by manufacturer — Watts specifies 5–7 psi empty; iSpring specifies 7–10 psi. Use your system's manual, not a universal figure. Check the Schrader valve with a tire gauge, adjust if needed, then wrap the tank nipple threads with Teflon tape and hand-screw the elbow valve.
Tubing connections (final step):
- Feed water tube → inlet port on the manifold
- Filtered water tube → RO faucet stem
- Storage tank tube → tank elbow valve
- Drain tube → drain saddle port

Follow the system-specific diagram. Tubing routes differ across standard, air-gap, and permeate-pump configurations — mixing them up will stop the system from working.
Post-Installation Checks: Flushing, Testing, and Leak Detection
New filter cartridges contain manufacturing preservatives and carbon fines. Do not drink the first water out of the system until flushing is complete.
Pressure Testing and Leak Inspection
Open the cold water supply valve slowly. Open the RO faucet until water flows steadily and air bubbles clear, then close the faucet and allow the system to pressurize. The first tank fill can take 4–6 hours according to Watts, or 2–3 hours per APEC's guidance, depending on pressure, temperature, and membrane production rate.
While the tank pressurizes, inspect every connection point:
- All push-to-connect fittings
- Threaded connections at the supply tee and tank valve
- Drain saddle clamp
- Faucet base and mounting hardware
Tighten anything showing a weep of moisture. A drip that looks small now will be a puddle under the sink within a week.
Once you've confirmed no leaks, move on to flushing the system before the water is safe to use.
Flushing Cycles
Allow the storage tank to fill completely, then drain it fully through the RO faucet. Watts requires this fill-and-drain cycle to be completed three times before the water is suitable for drinking. APEC requires at least one complete drain before use; iSpring recommends flushing the pre-filter stages separately into a bucket first.
Slow initial flow is normal. The membrane needs time to wet fully, and the tank needs pressure to build. Dark or discolored water during the first cycle is also expected : that's loose carbon fines from the GAC filter, not a system defect.
Signs the system is working correctly:
- Steady trickle from the drain line while producing water
- No leaks at any fitting after the first pressurization
- Clear water by the end of the second or third flush cycle
- Tank refills within a reasonable window (1.5–6 hours depending on conditions)
Signs of a problem:
- Continuous high-volume drain flow after the tank is full (likely a stuck auto shut-off valve)
- No drain flow at all (clog or closed valve)
- Persistent cloudy water beyond the third flush cycle

Common RO Installation Problems and How to Fix Them
Most post-installation problems trace back to a small number of root causes. Most post-installation problems trace back to a small number of root causes — and most have straightforward fixes you can handle without calling a technician.
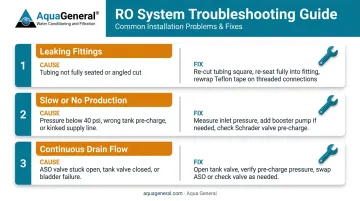
Leaking Fittings or Connections
Problem: Water drips at push-connect fittings or threaded connections after startup.
Likely cause: Tubing not fully seated (it must click in and resist a firm pull), tubing cut at an angle, or insufficient Teflon tape on a threaded fitting.
Fix: Shut off the feed water supply, release pressure at the RO faucet. Re-cut the tubing end square and re-seat firmly. For threaded connections, disconnect, re-wrap with 3–4 turns of Teflon tape keeping the first thread clear, and reassemble.
Slow or No Water Production
Problem: Tank takes unusually long to fill, or the faucet produces only a weak trickle after flushing.
Likely cause: Incoming pressure below 40 psi, incorrect tank air pre-charge, or a kinked supply line.
Fix: Measure inlet pressure with a gauge. If below 40 psi, a booster pump is needed. Check tank pre-charge at the Schrader valve — it should match your manufacturer's specification with the tank empty and the valve closed. Inspect all tubing runs for kinks.
Continuous Drain Flow After the Tank Is Full
Problem: The drain line keeps running water even after the tank is full.
Likely cause: Auto shut-off valve (ASO) not functioning, tank bladder failure, or the tank elbow valve was never opened after installation.
Fix: First, verify the tank valve is fully open. Check and adjust the tank air pre-charge. If those steps don't resolve the issue, a failed ASO or check valve is the most common culprit. Both are straightforward component swaps on most under-sink systems.
Pro Tips for a Successful RO Installation
Sequence Your Work Before the Cabinet Fills Up
- Install the RO faucet and drill all holes before mounting the filter assembly — maneuvering a drill in a cabinet already holding the manifold and tank is genuinely difficult
- Connect the faucet and drain saddle tubing before the cabinet fills up
- Take a photo of all tubing connections before closing up — troubleshooting is much easier when you don't have to reconstruct the layout from memory
Protect the Membrane With Pre-Treatment
Never run the system on untreated feed water if your source has known iron, hardness above 110 ppm, or high chloramine levels. Pre-treatment isn't optional in these situations — it's what keeps the membrane functioning long-term.
In Houston's climate, also confirm the installation area doesn't experience temperature extremes. Membranes operate best between 40°F and 100°F, per Watts and iSpring documentation.
When to Call a Professional Instead
- The cold water shutoff valve is stuck, corroded, or needs replacement
- The counter requires stone drilling
- Inlet pressure is well below 40 psi and requires pump integration
- Pre-treatment equipment needs to be added to address specific water quality issues
If any of those situations apply, Aqua General's TCEQ-licensed technicians and WQA-certified specialists can help. The team has been installing and servicing RO systems across Harris, Fort Bend, Montgomery, Galveston, Brazoria, and surrounding Houston-area counties for over 32 years.
Homeowners dealing with complex water quality concerns, or who want the installation done right the first time, can reach Aqua General at (713) 664-4601 for a professional assessment.
Frequently Asked Questions
How much does a reverse osmosis system cost to install?
A DIY under-sink RO kit typically ranges from $86 to $700 for the unit itself (Consumer Reports, 2025), with minimal added cost if you already have the tools. Professional installation runs considerably higher — HomeAdvisor's 2025 True Cost Guide puts the normal range at $1,000–$4,800, averaging around $2,200.
Can reverse osmosis remove radon?
Standard under-sink RO systems are not effective for radon removal — radon is a gas that escapes before reaching the membrane. The EPA recommends aeration or granular activated carbon with point-of-entry treatment as the most effective approach. A certified water specialist can confirm the right solution for your home.
How long does it take to install a reverse osmosis system?
Most DIY under-sink installations take 2–4 hours, depending on whether drilling is required, how accessible the cabinet is, and the homeowner's prior plumbing experience. Professional installation by an experienced technician is typically completed in 1–2 hours.
Do I need a plumber to install an under-sink RO system?
A licensed plumber is not required for a standard under-sink RO installation — no pipe cutting or soldering is involved. Under Texas law, a property owner may perform plumbing in their own homestead without a license. However, if the shutoff valve needs replacement, the counter requires stone drilling, or pre-treatment equipment must be integrated, calling a licensed water treatment specialist is the right call.
How often do RO filters need to be replaced?
Sediment and carbon pre-filters typically need replacement every 6–12 months depending on your system and water quality. The RO membrane lasts 2–5 years, and the post-filter polishing stage should be replaced annually. Houston's chloramine levels make keeping up with the pre-filter schedule especially important.
What water pressure is required for an RO system to work properly?
Most residential RO systems operate best at 40–85 psi. Pressures below 40 psi result in significantly slower production and may require a booster pump. Pressures above 85 psi should be managed with a pressure reducing valve — Watts requires a regulator above 100 psi to protect the membrane and system components.