USGS research on Gulf Coast aquifer wells found iron detections in at least 18 of 28 municipal source wells sampled in the Houston area — a reminder that water quality assumptions can be costly. For homeowners on private wells, the stakes are higher still.
This guide walks through the complete installation process: sizing requirements, pre-treatment assessment, step-by-step installation, post-install validation, and common troubleshooting.
Key Takeaways
- Install a 5-micron sediment pre-filter before the UV unit — this is non-negotiable
- Size by peak flow rate, required UV dose (Class A = 40 mJ/cm²), and source water UVT before purchasing anything
- Install on the cold water main, indoors, after all other treatment equipment
- Use a GFCI-protected outlet; never run the lamp dry
- Disinfect all downstream plumbing with bleach before the system goes into drinking water service
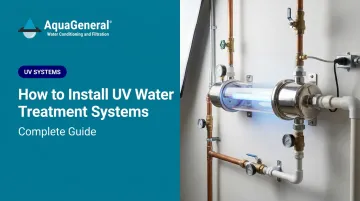
Installing a UV Water Treatment System
Installation follows a fixed sequence: size the system → confirm water quality → prepare the site → mount and plumb the chamber → connect electricals → validate and disinfect. Reordering these steps is the most common cause of performance failures and costly rework.
Prerequisites and Safety Considerations
Three sizing variables to determine before purchasing anything:
1. Peak flow rate Estimate based on pipe size and simultaneous fixture use. General benchmarks from Atlantic Ultraviolet:
- 3/4-inch pipe: ~7 GPM
- 1-inch pipe: ~15 GPM or higher
- Single-family homes typically fall in the 6–12 GPM range; 1 bathroom = 6 GPM, 2–4 bathrooms = 12 GPM
2. Required UV dose NSF/ANSI 55-2024 defines two certification classes:
- Class A: 40 mJ/cm² — for contaminated or uncertain water sources (well water, surface water)
- Class B: 16 mJ/cm² — supplemental treatment only, for water already confirmed potable
Don't conflate a system's maximum flow rating with its Class A flow rating. A VIQUA VH410 rated at 18 GPM delivers that capacity at 30 mJ/cm²; its Class A (40 mJ/cm²) rating is 14 GPM.
3. UV Transmittance (UVT) UVT measures how much UV light actually passes through your water. Most residential systems require UVT >75%; some VIQUA PRO models require 85%, and Atlantic Ultraviolet specifies 90%+ for a standard 30 mJ/cm² dose.
Any water below the system's UVT threshold needs pre-treatment before the UV chamber performs as rated.
Source water quality limits
These are the maximum acceptable levels before a UV system will perform as rated:
| Parameter | Limit |
|---|---|
| Iron | < 0.3 mg/L |
| Manganese | < 0.05 mg/L |
| Hardness | < 7 gpg / 120 mg/L |
| Turbidity | < 1 NTU |
| Tannins | < 0.1 mg/L |
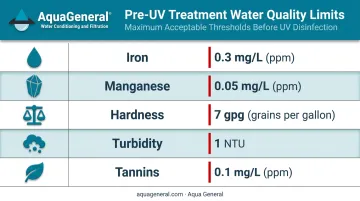
Sources: VIQUA, Pentair PUV-7/PUV-14 manuals
Exceeding any of these thresholds causes lamp fouling, quartz sleeve scaling, and reduced UV dose delivery. Houston-area homeowners on private wells should have water professionally tested before selecting a system. The Gulf Coast Aquifer shows variable iron and hardness levels across the region, and Aqua General provides free on-site water assessments to help size the right system for local conditions.
Safety non-negotiables:
- Install indoors, protected from freezing
- Use a GFCI-protected outlet — required by NEC within 6 feet of any sink
- Never touch the quartz sleeve with bare hands (skin oils reduce UV output); handle by metal ends or wear gloves
- Never look directly at an operating UV lamp
- Do not install on a hot water line
- Do not run the lamp without water in the chamber (dry-run causes immediate damage)
Tools and Materials Required
Components for a typical residential installation:
- UV chamber with mounting hardware and clamp
- 5-micron sediment pre-filter housing and cartridge
- Two shut-off ball valves (inlet and outlet)
- Hose bib for sampling and pressure release
- Pipe connectors and fittings matched to existing plumbing size
- GFCI outlet and electrical box
- Solid plywood backing board for wall mounting
Confirm the UV lamp and quartz sleeve are pre-installed before beginning; most modern systems ship with them in place, but verify before starting.
Tools required:
- Pipe cutter
- Propane torch, solid-core solder, and paste flux (copper systems)
- Adjustable wrenches
- Teflon tape
- Emery cloth
- Screwdrivers
- Spirit level
- Safety glasses and gloves
Push-fit or compression fittings can substitute for soldering, but must be rated for the system's operating pressure.
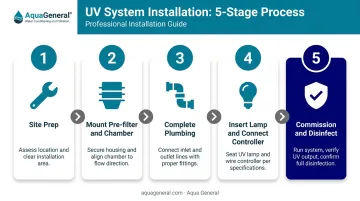
How to Install a UV Water Treatment System: Step-by-Step
Step 1 — Prepare the installation site
Shut off the main water supply and drain pressure from the line. Attach a solid plywood backing board to the wall at the chosen location. Install the GFCI outlet on or near the board. Before making any permanent connections, position all components in sequence — pre-filter housing → UV chamber → ball valve/hose bib — and dry-fit all plumbing to confirm measurements.
Step 2 — Mount the pre-filter housing and UV chamber
Secure the filter housing bracket and UV chamber clamp to the backing board. Slide the chamber into the clamp and tighten just enough to support it without stressing the ports. Attach threaded connectors to both the filter and UV chamber ports. Mount the controller bracket above or beside the chamber; always position it horizontally so moisture cannot run down the power cordage.
Step 3 — Complete the plumbing connections
Add a ball valve on the inlet side of the pre-filter. On the outlet side of the UV chamber, fit both a hose bib and a ball valve. For vertical installations, the water inlet goes at the bottom and the outlet at the top — this ensures proper contact time. Solder or connect all copper piping, completing as many connections as possible before breaking into the main waterline to minimize service interruption.
Step 4 — Insert the lamp and connect the controller
Insert the UV lamp into the chamber, leaving approximately two inches protruding from the end before attaching the lamp harness connector. The connector is keyed; it only fits in one orientation, and an audible click confirms proper seating. Connect the power cord to the controller but do not plug into the GFCI outlet yet. If the system includes a UV sensor, insert it now.
Step 5 — Commission the system
- Open all downstream faucets
- Slowly turn on the main water supply
- Inspect every connection carefully for leaks
- Once confirmed leak-free, plug the controller into the GFCI outlet and verify the lamp activates
- Disinfect downstream plumbing before putting the system into drinking water service: remove the pre-filter element, fill the housing with household bleach (5–9% sodium hypochlorite, unscented), and run water to all outlets until bleach is detectable
- Allow at least two hours of contact time, then flush thoroughly and replace the filter cartridge
VIQUA's installation manual specifies a minimum 50 mg/L chlorine solution for downstream distribution system disinfection. This step is not optional: pre-existing bacteria in downstream plumbing will persist if it's skipped.
Post-Installation Checks and Validation
Once everything is connected and powered on, run through two quick validation passes — structural and functional. Give the system 10–15 minutes after pressurization, then confirm:
Structural checks:
- All plumbing connections are tight and dry
- Chamber clamp is secure; chamber has not shifted
- Controller is mounted level and horizontal with drip loops in all cordage
- Lamp indicator is illuminated and no alarm is sounding
If the system includes a UV intensity sensor, verify the reading falls within the manufacturer's acceptable range. VIQUA controllers, for example, define normal operation as 75–99% UV output; readings below 50% trigger a solenoid shutoff.
Run water at your maximum expected flow rate and confirm the system does not alarm. Skipping this load test is the most common reason systems pass initial setup but fail to disinfect adequately under real demand. The warning signs below are exactly what to watch for during this step.
Warning signs of incorrect installation:
- UV alarm triggers at normal flow rates → system undersized or lamp not fully seated
- Leaks at quartz sleeve end caps → O-rings improperly seated or overtightened
- Controller trips the GFCI outlet → wiring fault or moisture in connections
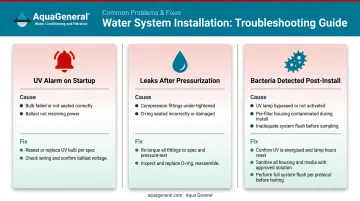
Common Installation Problems and Fixes
UV Alarm Triggers Immediately After Power-Up
The UV intensity alarm sounds on startup, or the lamp indicator shows insufficient output.
Common causes:
- Lamp connector not fully seated (listen for the audible click)
- Fingerprints or oils on the quartz sleeve
- Source water UVT below the system's rated threshold
Power down and re-seat the lamp connector until it clicks. Clean the quartz sleeve with rubbing alcohol — use gloves to avoid skin oils. Retest. If the alarm persists, compare source water UVT against your system's specifications.
Leaks at Inlet/Outlet or End Caps After Pressurization
Water seeps from plumbing connections or from the quartz sleeve end caps.
Common causes:
- Insufficient Teflon tape on threaded connections
- O-rings not properly seated or damaged during assembly
- Water pressure exceeding the system's rated limit
Depressurize and dry the connections. Re-wrap threaded fittings with fresh Teflon tape. Remove and re-seat end cap O-rings carefully — never overtighten. If pressure exceeds approximately 44 psi (3 bar), install a pressure-limiting valve upstream.
Water Tests Still Show Bacteria After Installation
Post-installation testing detects microbial contamination.
Common causes:
- Downstream lines were not disinfected after installation, allowing pre-existing bacteria to persist
- System is undersized for actual peak flow rate
- Sediment pre-filter is missing or clogged — particles cast shadows that shield microorganisms from UV exposure
Perform a full pipe disinfection procedure (bleach flush per Step 5). Confirm the system's rated flow matches peak demand. Verify the 5-micron pre-filter is installed and not overdue for replacement. Retest after each correction.
Pro Tips for Installing UV Systems Effectively
A few installation habits separate a system that performs reliably for years from one that causes problems at the worst time. Keep these in mind before and during your install:
- Finish all plumbing before powering up. Let soldered joints fully cool before inserting the lamp. Residual heat and moisture at first start-up are a common, avoidable cause of early lamp failure.
- Confirm maintenance clearance before drilling. You need at least one full chamber-length of open space at the lamp end for future lamp and quartz sleeve replacements, plus a minimum of 6 inches on the opposite end. Insufficient clearance is one of the most consistent oversights in residential installs, and it becomes a genuine headache at annual maintenance time.
- Keep your documentation. Hold onto water test results before and after installation, the system's rated dose and flow specifications, and the lamp installation date. For Texas homeowners on private wells, this documentation may be required for compliance with TCEQ guidance and gives any future service technician the context they need.
Conclusion
UV system performance is dependent on installation quality. A correctly sized, properly pre-treated, and fully validated system delivers reliable microbiological protection for years. Skip the UVT check, the pre-filter, or downstream disinfection, and the system can run quietly while leaving pathogens untreated.
If you're unsure about your water quality, pipe layout, or which system size fits your home, consult a licensed water treatment specialist before purchasing equipment. Aqua General's WQA-certified and TCEQ-licensed team serves eight counties across the Greater Houston area — assessing water conditions, sizing the right UV system, and completing professional installation.
Call (713) 664-4601 to schedule a free on-site water test.
Frequently Asked Questions
Where should I put my UV sterilizer?
Install the UV sterilizer indoors on the cold water main, after all pre-treatment equipment (softeners, sediment filters, pressure tanks), and before any branch lines. This ensures every fixture in the home receives treated water, and the purified water isn't re-contaminated downstream.
How much does it cost to install a UV light for well water?
Residential UV systems typically run $300–$800+ depending on capacity and certification class. Professional installation adds to that cost, and well water applications usually require upstream pre-treatment (iron filters, softeners), which increases the total investment.
Can I install a UV water treatment system myself?
Basic residential installation is manageable for a DIYer with plumbing experience, but sizing errors, water quality gaps, and GFCI electrical requirements carry real health consequences. Professional installation is strongly recommended for well water or unknown source water.
Do I need a sediment filter before a UV system?
Yes — a 5-micron sediment pre-filter is mandatory. Particles in the water create shadows that allow microorganisms to pass through the UV chamber unaffected, and Pentair and Watts both specify this requirement explicitly in their installation manuals.
How often does a UV lamp need to be replaced?
UV lamp output declines by approximately 30% over 9,000 hours of operation — roughly 12 months of continuous use. Replace the lamp annually regardless of whether it's still visibly lit — operating a degraded lamp significantly reduces disinfection effectiveness without any visible indication that anything is wrong.
What water quality issues will stop a UV system from working properly?
High iron, manganese, hardness, turbidity, and tannin levels all reduce UV transmittance and coat the quartz sleeve over time, cutting the delivered UV dose. Water exceeding manufacturer thresholds — iron above 0.3 mg/L, turbidity above 1 NTU, hardness above 7 gpg — must be treated upstream before a UV system can perform as rated.