When a membrane fails — or gets installed incorrectly — the consequences ripple through the system. Product water TDS climbs, flow rate drops, and downstream components like post-carbon filters absorb extra strain they weren't designed for. None of this is obvious until you test.
This guide covers how to identify when replacement is actually needed, what to prepare, and the correct sequence to swap the membrane and verify the system is working properly afterward.
Key Takeaways
- Most residential membranes last 2–5 years, but pre-filter neglect can cut that short regardless of age
- A TDS meter is the most reliable tool — both for deciding when to replace and for confirming the new membrane works
- Brine seal orientation and full membrane seating are non-negotiable — both failures produce poor rejection silently
- Skipping the post-installation flush contaminates your tank with preservatives and skews early TDS readings
- If the system still underperforms after a correct install, have a professional inspect it before drinking the water
Signs Your RO Membrane Needs Replacing
Performance degrades gradually, which is why waiting for obvious symptoms isn't a reliable strategy. Routine TDS monitoring is your most reliable early-warning tool.
Performance-Based Indicators
Calculate rejection percentage using this formula from the WQA's POU Reverse Osmosis Performance guide:
(Tap TDS − RO Product TDS) ÷ Tap TDS × 100 = Rejection %
A properly functioning new TFC membrane should achieve 90–98% rejection for sodium, 93–99% for calcium, and 90–98% for fluoride under normal residential conditions. If your rejection rate falls below 80–85%, that's a strong signal the membrane needs replacing.
Watch for these additional red flags:
- Noticeably slower water production at normal feed pressure
- Changes in taste or odor that persist after the tank has cycled
- Rejection declining steadily over several months of monitoring
What Houston-Area Homeowners Should Know
Greater Houston water conditions create more membrane stress than many other regions. According to the City of Houston's 2024 Water Quality Report, the Main System averages 230 ppm TDS and 110 ppm hardness — and some areas run higher.
| Area | Avg TDS | Avg Hardness |
|---|---|---|
| Houston Main System | 230 ppm | 110 ppm |
| Belleau Woods | 262 ppm | — |
| Willow Chase | — | 175 ppm |
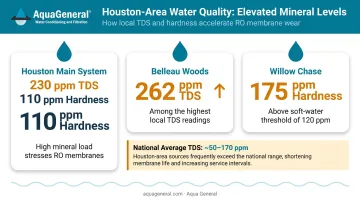
Higher TDS increases osmotic pressure, which reduces the net driving pressure across the membrane at any given feed pressure. The practical result: membranes in this region often wear faster than their rated lifespan, especially when pre-filters aren't changed on schedule.
Aqua General recommends replacing pre-filters every 6–12 months for Houston-area residential systems. Homes with upstream water softeners can often extend that interval significantly.
How to Change a Reverse Osmosis Membrane
The replacement process moves through a clear sequence: shut down, depressurize, swap the membrane, reassemble, flush, and test. Each stage builds on the last — rushing the flush or skipping proper seating is the most common reason a new membrane fails to improve water quality.
Before You Start: Supplies and Safety Check
Essential supplies:
- Compatible replacement membrane (matched to housing size, GPD rating, and brine seal style)
- TDS meter
- Towel and shallow pan
- Food-grade silicone lubricant for O-rings
Optional but useful:
- Adjustable pliers (for a stuck membrane or tight housing cap)
- Replacement O-ring (same size as existing)
Before purchasing, confirm your replacement membrane's GPD rating matches your existing flow restrictor. If you're upgrading to a higher GPD membrane, the flow restrictor typically must change as well — without a matched restrictor, system pressure balance is disrupted and production can fail entirely.
Do not proceed if any of these apply:
- The housing shows visible cracking
- Feed water contains untreated chloramine that the carbon stage cannot handle (DuPont states TFC membranes have a chlorine tolerance of roughly 200–1,000 ppm-hours before degradation)
- The system is a commercial or whole-house unit with pressure ratings above standard residential ranges
For Houston homeowners unsure about compatibility, Aqua General services a wide range of brands — including AquaPro, Pentair, GE, Water Factory, and others — and can be reached at (713) 664-4601 to confirm parts before you purchase.
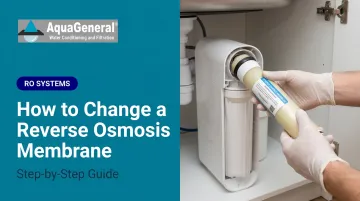
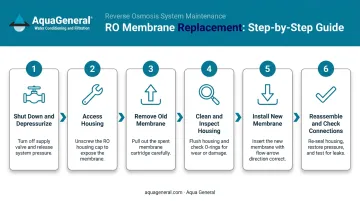
Step-by-Step: Removing the Old Membrane and Installing the New One
Step 1 — Shut down and depressurize Turn off the feed water valve. Unplug any booster pump or UV stage. Close the storage tank valve. Open the RO faucet and let it run until flow stops — this relieves pressure and prevents water spray when you open the housing.
Step 2 — Access the membrane housing Place a towel and shallow pan under the horizontal membrane housing (the long cylinder, typically separate from the vertical pre-filter housings). Disconnect the tubing from the cap end using the quick-connect release collar. Unscrew the cap by hand; use adjustable pliers carefully if it resists — avoid cracking the housing.
Step 3 — Remove the old membrane Pull the membrane out by its center stem. If stuck, apply gentle rotational pressure with pliers while pulling — don't scratch the housing interior. Note which end entered first and the orientation of the brine seal. The new membrane must match this exactly.
Step 4 — Clean and inspect the housing Wipe the interior with a clean damp cloth. Inspect the housing O-ring for nicks, flattening, or cracking — a compromised O-ring causes post-installation leaks far more often than the membrane itself. Replace the O-ring if there's any doubt, and apply a thin layer of food-grade silicone lubricant before reseating it.
Step 5 — Install the new membrane Remove the new membrane from packaging without touching the membrane surface. Insert it with the double O-ring end going in first, matching the original orientation. Push firmly until the membrane seats fully into the end slot.
Twist slightly and press again to confirm it's locked. An incompletely seated membrane allows water to bypass the filtration surface — the result is elevated TDS that mimics a defective membrane.
Step 6 — Reassemble and check connections Thread the housing cap by hand first to avoid cross-threading, then hand-tighten snugly. Reinsert tubing into the quick-connect fitting and pull back gently to confirm it's locked. Turn the feed water on slowly and inspect the cap seam, fittings, and housing body immediately. Any drip means shut off, depressurize, and reseat before continuing.
Flushing the New Membrane
New membranes ship with a food-grade preservative that must be cleared before water enters your storage tank. Skipping this step causes off-tasting water, temporarily unreliable TDS readings, and can shorten the life of downstream post-carbon or DI stages.
Flush sequence:
- Keep the storage tank valve closed
- Direct product water to drain — open the RO faucet or route the product line to a bucket
- Run for a minimum of 2 hours (Pentair's PRF-RO manual specifies this as the minimum; stable maximum performance is reached after 8 hours of rinsing)
- After flushing, open the tank valve and fill it once
- Discard the first full tankful before using the water for drinking
In Houston's warmer months, the flush proceeds faster. Colder winter tap water will slow membrane output during this stage — a WQA permeate flow study confirms that permeate flow decreases roughly 3% per 1°C drop in temperature, so don't cut the flush short just because flow seems slow.
Post-Installation Testing
After the flush, measure both tap TDS and RO product TDS, then calculate rejection percentage using the formula above. A correctly installed new membrane should show 90–98% rejection under normal residential pressure and temperature.
| Result | What It Means |
|---|---|
| 90–98% rejection, restored flow, no taste issues | Correct installation |
| Below 85% rejection after adequate flush | Likely seating or orientation problem |
| Slow flow, acceptable rejection | Pre-filter or pressure issue, not the membrane |
| Leaking at cap seam | O-ring problem |
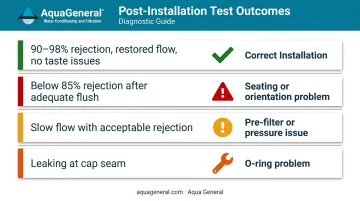
If rejection is below 85% after adequate flushing, do not drink the water — investigate first.
Common RO Membrane Replacement Problems and Fixes
Most post-replacement issues trace back to installation details rather than a defective membrane. Here are the three most common problems and how to resolve them.
Problem 1: High Product TDS After Replacement
High TDS after a fresh membrane swap usually means the membrane isn't fully seated, the brine seal faces the wrong direction (letting water bypass the filtration surface), or the flush period was cut short.
To fix it:
- Shut off the system and depressurize
- Reopen the housing and carefully remove the membrane
- Reinsert it fully, confirming the brine seal orientation matches the original
- Flush the system again before retesting
Problem 2: Leaking at the Membrane Housing Cap
Cause: A pinched, dry, or damaged O-ring — or a cap that was cross-threaded during reassembly.
Fix: Shut off and depressurize, remove the cap, inspect and re-lubricate the O-ring (replace it if damaged), then re-thread the cap by hand before hand-tightening. If the housing itself shows cracking, it needs to be replaced entirely.
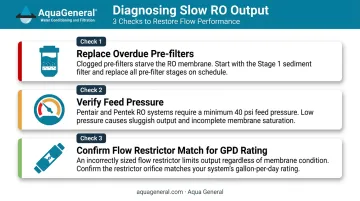
Problem 3: Slow Water Production After Membrane Change
Slow output is frequently blamed on the new membrane, but the actual culprit is usually elsewhere. Common causes include low feed pressure, cold inlet water temperature, clogged pre-filters, or a flow restrictor mismatch when a different GPD membrane was installed.
Work through these checks in order:
- Replace pre-filters if they're overdue — a clogged stage 1 sediment filter is a frequent offender
- Verify feed pressure; both Pentair and Pentek systems require a minimum of 40 psi inlet pressure, and output drops noticeably below that threshold
- If you upgraded to a higher GPD membrane, check the membrane manufacturer's specs for the matching flow restrictor size
Pro Tips for a Successful RO Membrane Replacement
Replace Pre-Filters at the Same Time
Installing a fresh membrane behind an exhausted carbon filter is one of the fastest ways to shorten its lifespan. Chlorine and chloramine exposure degrades TFC membranes — DuPont states that residual free chlorine causes salt rejection loss after roughly 200–1,000 ppm-hours of exposure. The pre-filter is the membrane's first line of defense. If the pre-filters are due, swap them out at the same time.
Document the Installation
Record these details immediately after flushing is complete:
- Replacement date and membrane brand
- GPD rating of the new membrane
- Tap TDS, product TDS, and rejection percentage
This baseline makes future performance comparisons meaningful — you'll know what "normal" looks like for your specific system.
Know When to Call a Professional
If the system continues to show poor rejection after correct installation and adequate flushing, or if the housing, fittings, or system design is unfamiliar, don't keep drinking the water while troubleshooting.
Aqua General's WQA-certified technicians have been servicing RO systems across Greater Houston for over 32 years and carry replacement parts for a wide range of brands. Call (713) 664-4601 or email service@aquageneral.com.
Frequently Asked Questions
How much does it cost to replace a reverse osmosis membrane?
Replacement membranes for standard residential systems typically range from $33 to $130, depending on brand and GPD rating (a 50 GPD FilmTec runs around $33, while a Pentair GRO-50EN lists closer to $93–$130). Professional installation adds a service fee but includes correct seating verification, post-installation TDS testing, and O-ring inspection.
How often should a reverse osmosis membrane be changed?
Most residential membranes last 2–5 years under good conditions. Aqua General recommends replacement every 2–3 years for Houston-area systems given local TDS and hardness levels. TDS rejection testing is more reliable than a fixed schedule: a membrane at 18 months may already be underperforming, while one at 4 years may still pass.
How do I know if my reverse osmosis membrane needs replacing?
Test rejection percentage: if your RO product TDS is more than roughly 10–20% of your tap TDS, the membrane is underperforming. Slower output and changes in water taste are supporting indicators, but TDS meter readings give you the most definitive answer.
Can I replace an RO membrane myself?
Most standard under-sink residential membranes are DIY-accessible. The main risks are incorrect brine seal orientation and incomplete seating — both cause poor water quality without obvious signs. Older systems, commercial units, or systems with booster pumps are better handled by a professional.
What happens if I don't replace my RO membrane?
A worn membrane passes more dissolved solids into your product water, reducing filtration effectiveness. Over time, the membrane works harder to produce less output, increasing strain on downstream components like post-carbon filters and shortening their useful life.
Does the direction I insert the RO membrane matter?
Yes. The brine seal must face the correct flow direction. According to Hydranautics' technical bulletin, the brine seal must be properly seated and oriented in the feed-flow direction. Installing it backwards allows water to bypass the membrane surface entirely, producing poor contaminant rejection even in an otherwise correctly assembled system.