Key Takeaways
- A worn distributor or bypass O-ring can let hard water bypass the resin bed entirely, even during normal operation
- Houston's municipal water averages 110 ppm hardness and 3.0 ppm chloramines, both of which accelerate O-ring wear
- Worn seals require model-specific parts and proper silicone lubrication -- incorrect repairs cause ongoing hardness problems
- A professional service visit costs far less than a misdiagnosed repair or ongoing scale damage to appliances
- Aqua General's WQA-certified technicians diagnose and resolve O-ring failures across the Greater Houston area
You filled the salt tank. The unit ran its regeneration cycle overnight. Yet your showerhead is scaling, laundry feels stiff, and soap barely lathers. Sound familiar?
A full brine tank doesn't guarantee the system is actually softening water. One of the most overlooked causes of returning hardness is a worn or failed O-ring inside the valve head or bypass assembly.
When these small rubber seals fail, hard water travels around the resin bed rather than through it. The softener keeps cycling normally, with no indication anything is wrong.
Identifying and resolving O-ring failures requires the right parts, proper tools, and an accurate diagnosis -- which is why most Houston homeowners rely on Aqua General's professional service team to restore full softening performance.
What O-Rings Do Inside a Water Softener (and Why They Affect Hardness)
The Sealed Flow Path
A water softener works by forcing hard water down through a resin bed, where calcium and magnesium ions are exchanged for sodium. The treated water then travels back up through a central riser tube and out to your home's supply lines. That flow path only works if it's pressure-tight at every junction.
O-rings create those seals. Specifically, they seal three critical points:
- The distributor/riser tube junction -- where the valve head meets the resin tank neck
- The bypass assembly connection -- where the softener body connects to the bypass valve
- Individual valve body ports -- internal seals that keep flow directed correctly through service and regeneration cycles
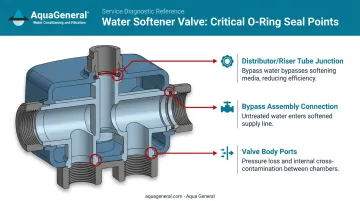
If any of these seals fails, untreated hard water can "bleed" around the resin bed rather than through it. The result is exactly what you'd expect: the unit appears to function normally, but softened water output reads elevated on a hardness test.
What Degrades O-Rings Over Time
Industry testing has confirmed that the shift to chloramine disinfection has caused NSF-certified seal materials to degrade prematurely. For customers on Houston's municipal supply, Houston's 2024 Water Quality Report shows chloramines averaging 3.0 ppm in the main system, with ranges reaching 5.4 ppm. At those concentrations, chloramine accelerates seal degradation in systems not fitted with chloramine-resistant materials.
Other degradation factors include:
- Age and general material fatigue
- High or fluctuating water pressure
- Heat cycling in systems installed near water heaters
No manufacturer publishes a fixed O-ring replacement interval -- degradation depends too much on local water chemistry, pressure, and installation history. The practical approach: have seals inspected by a professional whenever your water hardness climbs without an obvious explanation.
Signs Your Water Softener O-Ring Needs Professional Service
The Primary Symptom: Hardness Returning After Regeneration
The clearest indicator is water hardness that returns even after a fresh regeneration cycle. The Water Quality Association defines soft water as less than 1 gpg (17.1 mg/L) under NSF/ANSI 44 and 330. If a sample drawn shortly after regeneration completes reads elevated, a distributor O-ring leak is a likely suspect, and a professional water quality test can confirm it.
That comparison depends on knowing your starting point. Houston's main system averages 110 ppm as CaCO3, Sugar Land reports up to 280 ppm, and Richmond averages 9.76 gpg (167 mg/L). If your post-regeneration reading is close to your local raw-water baseline, water is bypassing the resin bed.
Other Signs to Watch For
- Moisture or seepage around the valve head or bypass connection -- visible water is an obvious seal failure indicator
- Salty taste in softened water shortly after regeneration begins -- suggests brine is escaping through a leak path faster than intended
- Drop in household water pressure -- a compromised valve seal can restrict flow in adjacent ports
- Scale accumulating on fixtures that were previously scale-free -- research from the Water Quality Research Foundation shows gas water heaters on hard water accumulate 1.16 lbs of scale per year versus just 0.01 lbs on softened water
If you're seeing any of these symptoms, contact a water softener repair technician for a diagnosis before the problem causes further scale damage to your appliances.
Why Professional O-Ring Service Is the Right Choice
The Hidden Risks of Incorrect Repairs
O-ring replacement looks straightforward, but errors are common and their consequences aren't immediately obvious. The most frequent problems include:
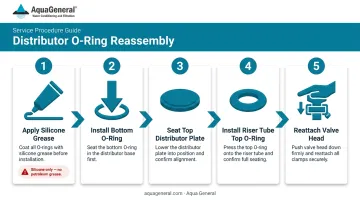
- Wrong part selection -- O-ring dimensions vary by valve brand and model. Guessing the size risks an improper seal and the same hardness problems you're trying to fix.
- Incorrect lubricant -- Only 100% silicone-based lubricant is safe for potable water contact. Petroleum-based greases degrade rubber O-rings and accelerate the exact failure you're trying to prevent.
- Skipping depressurization -- The system must be fully depressurized before the valve head is separated. Pressurized water will spray when the valve is opened.
- Incomplete seating -- O-rings must be installed in the correct sequence and seated fully. A partially seated seal allows hard water to continue bypassing the resin bed with no visible indication.
A professional technician arrives with the correct model-specific parts, the right tools, and the diagnostic experience to verify the repair actually worked -- not just that the system runs again.
What Aqua General's Service Covers
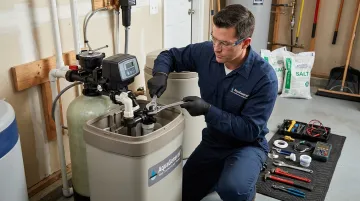
When you call Aqua General for water softener service, a WQA-certified technician will:
- Test post-regeneration water hardness to confirm whether the O-ring is the root cause
- Source the correct model-specific replacement parts for your valve brand (many major valve brands supported)
- Inspect all seal positions -- distributor, riser tube junction, bypass assembly, and valve body ports
- Apply correct silicone lubrication and verify full seating at each point
- Run a complete regeneration cycle and confirm hardness reads 0-1 gpg before leaving
- Check for secondary issues (salt bridging, injector clogs, resin age) that a simple O-ring swap won't resolve
When the Problem Goes Beyond the O-Ring
Sometimes an O-ring is the presenting symptom of a deeper issue. Situations that require more than a simple seal replacement include:
- The valve piston or seal assembly requires internal disassembly beyond simple O-ring access
- The distributor tube itself is cracked or distorted (manufacturer manuals list a cracked distributor tube as a separate check point from O-ring failure)
- The unit is an older model with a discontinued valve that requires expert parts sourcing
- Post-service hardness persists despite a confirmed, properly executed O-ring replacement
Aqua General has been serving the Greater Houston area for over 32 years, with coverage spanning Harris, Fort Bend, Montgomery, Brazoria, Galveston, and surrounding counties. The company stocks parts for a wide range of valve brands, so sourcing O-rings for older or less common systems isn't an issue. Their WQA-certified technicians provide professional water softener service and can diagnose what a simple part swap can't fix.
Frequently Asked Questions
Why is my water softener not reducing hardness?
The most common causes are a worn distributor O-ring allowing hard water to bypass the resin bed, salt bridging or low salt in the brine tank, a fouled or exhausted resin bed, or a clogged injector screen. A professional technician can test hardness immediately after a manual regeneration cycle to narrow down whether the issue is flow-path related or regeneration-related, then resolve the root cause.
How often should water softener O-rings be inspected?
There's no fixed schedule. A professional service visit any time you notice symptoms like returning hardness or valve-area moisture is the most reliable approach. Under normal conditions with municipal water, most O-rings last 5-10 years. Houston's chloramine levels can accelerate that timeline, so scheduling periodic professional service is worth building into your maintenance routine.
What size O-ring does my water softener need?
O-ring dimensions vary by valve brand and model. This is one reason professional service matters -- a technician knows the correct specifications for your specific valve and arrives with the right parts. Guessing the size risks an improper seal and the same hardness problems you're trying to fix.
What lubricant is safe for water softener O-rings?
Only silicone-based lubricant should be used. Petroleum-based products degrade rubber O-rings over time and accelerate the seal failure you're trying to prevent. Softener valve manufacturers all specify silicone-only lubrication in their service documentation. Professional technicians use the correct lubricant as a matter of routine.
What happens if a worn O-ring goes unaddressed?
An unaddressed worn O-ring continuously allows hard water to bypass the resin bed. Over time, scale builds up in pipes and appliances. Electric water heaters on untreated hard water can accumulate up to 2 lbs of scale per year, compared to virtually none on softened water -- cutting efficiency and shortening appliance lifespan. Calling for professional service early prevents this damage from compounding.
Is a leaking valve head always caused by a bad O-ring?
Not always. While a worn O-ring is the most common cause, other possibilities include a cracked distributor tube, a damaged valve body, or clamps that weren't fully re-seated after prior service. A professional visual inspection during service can identify the true source and address it completely.