NSF certification is the clearest signal that a water softener performs the way its marketing claims. It is also one of the most misunderstood marks in residential water treatment. Certification is granted to individual models rather than to brands, it verifies different things depending on which standard a product is listed under, and it says nothing about whether a system is sized correctly for a particular home.
This page explains what NSF certification requires, what each standard actually verifies, how to confirm that a listing is genuine, and which Texas regulations apply alongside certification.
Key Takeaways
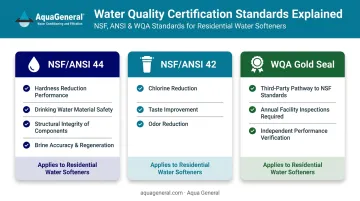
- NSF/ANSI 44 is the residential water softener standard, covering hardness reduction, material safety, structural integrity, and brine dosing accuracy
- Certification is issued at the model level, not the brand level - verify the exact model number in the NSF certified products database
- A system certified to NSF/ANSI 44 is not automatically certified to NSF/ANSI 42, which covers chlorine, taste, and odor reduction
- The WQA Gold Seal certifies products to the same NSF/ANSI standards through a separate accredited pathway
- Certification verifies the product, not the sizing or the installation - Texas separately requires a TCEQ Class III licensed Water Treatment Specialist for contracted work
What NSF Certification Is
NSF/ANSI standards are consensus standards for drinking water treatment units. A certification body tests a product against the relevant standard, reviews the safety of every material that contacts drinking water, and continues to monitor the product after listing through periodic facility audits and retesting. Only models that have completed that process may carry the mark, and only for the standards they were listed under.
That last point is where most confusion begins. The mark on a box is not a general statement of quality. It is a claim that one specific model met one specific set of requirements.
What NSF/ANSI 44 Requires
NSF/ANSI 44 is the primary standard for residential cation-exchange water softeners. A system listed under it has been verified to:
- Reduce calcium and magnesium to measurable hardness reduction benchmarks
- Use wetted components that are safe for contact with drinking water
- Withstand defined structural and pressure thresholds across tanks, valves, and pressure vessels
- Deliver the correct salt dose during the regeneration cycle
- Meet tested benchmarks for softening capacity and rinse effectiveness
Certification Applies to Models, Not Brands
NSF certification is issued at the model level. A manufacturer that lists one softener under NSF/ANSI 44 has not certified its entire catalog, and a brand that advertises certification in general terms may still sell uncertified models alongside listed ones. The only reliable check is the specific model number against the current listing.
NSF/ANSI 44 vs. NSF/ANSI 42 vs. WQA Gold Seal
| Standard | What It Covers | Applies To |
|---|---|---|
| NSF/ANSI 44 | Hardness reduction, material safety, structural integrity, brine dosing accuracy | Residential cation-exchange water softeners |
| NSF/ANSI 42 | Aesthetic effects - chlorine, taste, and odor reduction | Separate certification; not automatically included with NSF/ANSI 44 |
| WQA Gold Seal | Certification to NSF/ANSI standards through a separate accredited pathway, including annual facility inspections | Equivalent rigor to NSF; some systems carry both |
A softener certified to NSF/ANSI 44 does not carry NSF/ANSI 42 status by default. If chlorine or taste and odor reduction matters - particularly relevant in Houston, where the main municipal system uses chloramines - the specific model must be listed under both standards, or paired with a system that addresses chemical reduction separately.
What NSF Certification Does Not Cover
Certification answers a narrow question: does this product, as tested, meet this standard? Several things fall outside that scope.
- Other contaminants. NSF/ANSI 44 covers hardness. Chlorine, chloramines, taste, and odor fall under NSF/ANSI 42 and require their own listing.
- Correct sizing. Grain capacity has to be matched to household demand and local hardness. A certified system that is undersized for its home will still deliver hard water.
- Installation and code compliance. Certification testing happens in a laboratory. It says nothing about drain line air gaps, bypass orientation, or local plumbing code.
- Ongoing performance. A certified system that is never serviced, or that runs on the wrong regeneration settings, will not deliver its certified performance.
Certification is the starting point for evaluating a system, not proof that a given installation will perform.
How to Verify an NSF Certification
- Locate the exact model number on the system's data plate or specification sheet, not the product family name
- Search that model number in the NSF certified products database
- Confirm which standard or standards the listing covers, since NSF/ANSI 44 and NSF/ANSI 42 are listed separately
- Confirm the listing is current, since certifications can lapse
If a model does not appear in the database, it is not NSF certified, regardless of what the packaging suggests.
Texas Requirements That Apply Alongside Certification
NSF certification is a product standard. Texas imposes separate regulatory requirements that apply regardless of which system is chosen:
- Installer licensing - anyone who installs, connects, or services potable-water treatment equipment under contract must hold a TCEQ Water Treatment Specialist license, with Class III covering installation and repair, unless they are a licensed plumber
- Brine discharge - Texas Health and Safety Code Section 366.013 prohibits routing softener brine into an on-site sewage disposal system unless the unit uses demand-initiated regeneration
Neither requirement is satisfied by certification alone. A fully NSF certified softener connected by an unlicensed contractor is still non-compliant.
Why Certification Matters for Houston Homeowners
Hardness across the Greater Houston area ranges from roughly 1.7 to 16.4 gpg depending on the utility, which means the grain capacity appropriate for one household may fall well short for another a few miles away. Certification confirms that a system reduces hardness to a tested benchmark. It does not confirm that the model in question has enough capacity for a specific home's demand.
Chloramine disinfection adds a second consideration. The City of Houston main system and several surrounding utilities disinfect with chloramines, which can degrade valve components and seals on systems not rated for them. Because chloramine reduction falls under NSF/ANSI 42 rather than NSF/ANSI 44, a softener can be fully certified for hardness while offering no verified chloramine performance at all.
Aqua General holds a TCEQ Class III Water Treatment Specialist license and the WQA Certified Water Specialist designation, and has served the eight-county Greater Houston area for over 32 years. For homeowners comparing certified systems, a free on-site hardness test establishes the baseline that determines which certified model and capacity actually fit the home.
Frequently Asked Questions
Which NSF standards must water softener systems comply with?
NSF/ANSI 44 is the primary standard for residential water softeners, covering hardness reduction effectiveness, material safety, structural integrity, and brine dosing accuracy. WQA Gold Seal certification applies equivalent testing through a separate pathway. A system certified to NSF/ANSI 44 is not automatically certified to NSF/ANSI 42 (taste, odor, and chlorine reduction); those claims require separate listing.
Which water softener systems are NSF certified?
Certified systems can be verified through the NSF certified products database. Certification is issued at the individual model level - confirm the exact model number and the specific standards it is certified to, since certification does not extend to an entire product line from a single listing.
Is NSF/ANSI 44 the same as NSF/ANSI 42?
No. NSF/ANSI 44 covers hardness reduction and the structural and material safety of cation-exchange softeners. NSF/ANSI 42 covers aesthetic effects: chlorine, taste, and odor reduction. A product may be listed under one, both, or neither.
Is the WQA Gold Seal equivalent to NSF certification?
The WQA Gold Seal certifies products against the same NSF/ANSI standards through a separate accredited certification body, and its program includes annual facility inspections. Some systems carry both marks. What matters is the standard a model is listed under, not which body issued the listing.
Does NSF certification cover installation?
No. Certification applies to the product as tested, not to the workmanship of any particular installation. In Texas, contracted installation of potable-water treatment equipment separately requires a TCEQ Class III licensed Water Treatment Specialist, unless the work is performed by a licensed plumber. Improper installation can void a manufacturer's warranty and can leave a certified system bypassing softening entirely.
Does NSF certification guarantee my water will be soft?
No. Certification confirms that a model reduced hardness to a tested benchmark under laboratory conditions. Delivered performance also depends on sizing the grain capacity to the household's demand and local hardness, programming the control valve to the tested hardness level, and maintaining the system. A certified but undersized or misconfigured system can still deliver hard water.